A Senior Telemaster as an APM test platform
By Andrew Tridgell [ http://diydrones.com/profile/AndrewTridgell ]
DIYDrones.com
By Andrew Tridgell
July 31, 2011
The CanberraUAV [ http://www.canberrauav.com/ ] team has submitted its deliverable 1 report [ https://docs.google.com/viewer?a=v&pid=explorer&chrome=true&srcid=0BxJBg_6KSZ5zOTk0ZWUxOTUtYWI1Zi00OGU4LTk1YmUtMTgwN2Y3OTg0ODky&hl=en_GB ] for the outback challenge [ http://www.uavoutbackchallenge.com.au/2011/ ], so we are back to doing development and testing of our test platforms again.
The main platform we have been using lately is a Senior Telemaster [ http://www.hobby-lobby.com/srtele_arf.htm ], which I got 2nd hand from another club member at CMAC [ http://cmac.org.au/ ]. It has been a great test plane, and I'd highly recommend it for doing UAV development.
I was initially concerned it may be a bit too big for my car, but I found that it did fit (just!), although it is also a fairly tight fit in my study at home when I put the wings on to do a CoG test.

The plane came without a motor, so the first thing to do was work out what motor/prop/ESC/battery combination would work. I knew I'd be loading it up with a lot of electronics, so I aimed for enough thrust to handle well over 6kg flight weight (its total flight weight with all the electronics ended up at 6.5kg). Because it is a front-prop plane, it had to be electric as otherwise we'd get too much gunk on the cameras. After playing with a prop calculator [ http://ecalc.ch/motorcalc_e.htm?ecalc ] for a while, I worked out what a E-flite 32 would do the job nicely, with 2x5Ah 4S LiPos in parallel to drive it and a 13x6.5 prop. I got a 100A ESC and isolated it from the rest of the electronics by cutting the +ve wire on the throttle lead, and the plane was setup for power. Now that we've flown it a bit the E-flite 32 turned out to be a great choice. It takes off in just a few meters and has plenty of power, and gives us flight times of about 35 minutes, despite the heavy load. I wanted a sedate slow flying plane as a camera platform, and this turned out to be ideal. The watt meter shows it pulls a little over 60A at full throttle, which should be just under the 60A limit of the motor once its through the ESC. It cruises at below 1/3 throttle.
Making room for the electronics
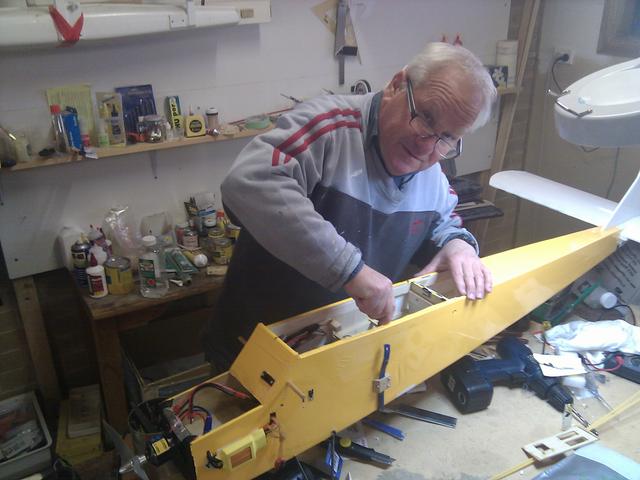
The next step was to get the fuselage ready for a pile of electronics. The rudder and elevator servos were right under the wing where the fuselage is largest, which was also where we wanted to put all the electronics, so Jack moved then back to behind the wing for me. It's handy having someone on the team who is good with balsa!

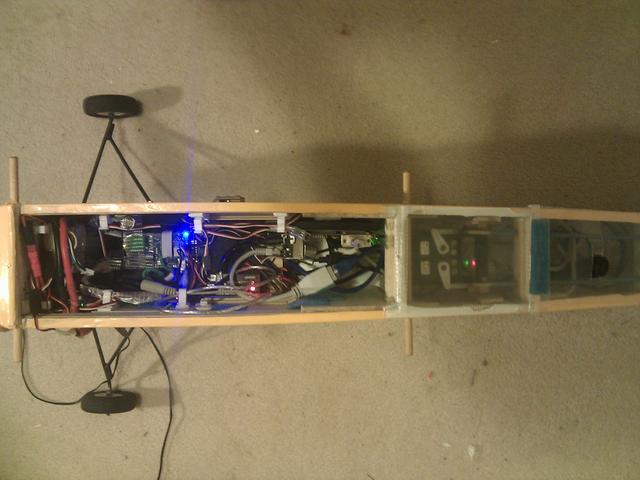
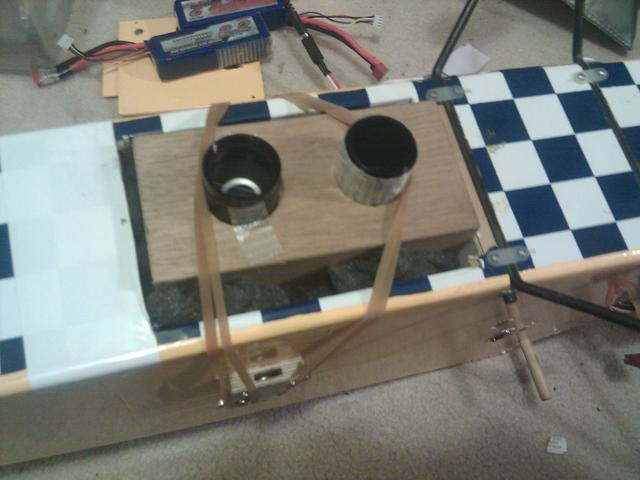
After that we just needed to fit the electronics in. This aim for this plane is to be a scaled down test version of the Mugin we are using for the OBC competition, so we put in as many of the same electronics as we will be using in the competition as possible. That means a pandaboard [ http://pandaboard.org/ ], a 32G SSD, a Ubiquity bullet TDMA radio [ http://store.freenet-antennas.com.au/product_info.php?cPath=22_74_76&products_id=330&osCsid=b204d8ca18026dc27dac71e11a072d2f ],, a PoE injector for the radio, and a couple of cameras on the bottom. We also added a pitot tube for airspeed, a mixer for flaperons (for really slow easy landings!), a UBLOX GPS and of course a UBEC to power all the electronics (a castle creations 10A).


The cameras take still images, one in IR grey-scale, the other IR-filtered colour. The IR camera is a a href="http://web.archive.org/web/20121029150243/http://www.ptgrey.com/products/chameleon/chameleon_usb_camera.asp" rel="nofollow" target="_blank"> ptgrey chameleon machine vision camera. We'll probably use a 2nd ptgey chameleon colour camera for the competition, but for now we're using a Philips webcam for the colour images (a SPC 900NC). The idea behind the dual camera system is to give us better rejection of false positives in the IR search for 'Outback Joe' by looking for places with a high IR signature but low on the IR filtered camera. The colour camera also looks for the distinctive coloured clothing that Joe should be wearing.
Software setup
The pandaboard runs the Ubuntu Natty Linux distribution, and on top of that it runs the mission control software, which is mostly python scripts using pymavlink [ http://www.qgroundcontrol.org/doku.php?id=mavlink:pymavlink ], in particular MAVProxy, which proxies the MAVLink stream from the APM to the ground control station (which runs another copy of MAVProxy). It also runs the camera capture software, which does the gain and exposure control to keep the images at a reasonable level for finding the IR lamp. The ptgrey chameleon camera really shines at that, with most of our exposures taken at around a 100us exposure or so, which means no blurry images! That is pretty good given we have a IR-pass filter in front of the lens blocking all the visible parts of the spectrum.
Radio Link
We link from the plane to the ground using an ethernet bridge radio, a Ubiquity Bullet which is a 300mW radio at 5.8GHz. On the plane we currently had a 5dBi omni antenna, although we will probably switch to a higher gain antenna soon and start using servos and the APM attitude values to keep it pointing straight down. We did some range testing on the radios yesterday with a 20dBi phased array antenna on the ground station, and got a good link at 5.2km. We're aiming for a high quality link at over 10km, with about 5Mbit of bandwidth or better (we want to send a H.264 video stream from an IP camera on the plane).
We also have an XbeePro900 straight from the APM to the GCS, and we're planning on having a DroneCell as well for a GSM link. We will probably also upgrade the 900MHz link from an Xbee to something with a bit more power. The idea is for the ground station to monitor all the links in parallel, and auto-switch between the links according to a priority order, so if we lose the main 5.8GHz link we still have full telemetry and control via the secondary links.
Ground setup
While on the ground we have a ground power lead, so we can do all our electronics setup without running the avionics battery out. We also use our sunlight readable laptop [ http://diydrones.com/profiles/blogs/budget-sunlight-readable ] to ensure we can use the GCS easily at the field. The GCS also reads out key data using a text to speech package, so we know if (for example) we're running low on power in the batteries on the plane. All of that info is transmitted via MAVLink from the plane.
AAll up this plane has turned out to be pretty much perfect for us to prepare for the outback challenge. Once we've perfected it we'll move onto the larger Mugin, but for now, the Telemaster is great!
12:19am
Copyright 2011 http://diydrones.com/p>